
Friday, August 24, 2012
easy homemade birthday card
Now I love my cricut for making cards and scrapbooking, but this is a super easy card that you don't need a cricut for. It's really simple, just roll up different colored paper and glue to a blank card. For the wick you can use a small white rope or I just used thin white ribbon because I had some spare from another project. Cut the rope/ribbon into small pieces and glue to the card and the inside of the rolled up paper. Then you can either write or stamp "Happy Birthday" and voila you have a homemade birthday card! This project only took me 15-20 minutes :)


Thursday, August 23, 2012
Budget bathroom remodel- Phase 1: TILE
Well this is my bathroom before . . . I'm ashamed to admit that we had carpet in our bathroom ever since we bought our house TWO years ago. Keeping the carpet clean around the toilet was not easy, so when my awesome Aunt and Uncle volunteered to come visit for the weekend and help us tile our bathroom, we jumped at the opportunity!

Our first step was to remove the carpet and linoleum . . . luckily Shaun did all this while I was a work ;) My Aunt and Uncle arrived friday evening and got straight to work that night laying down the backer board.

All day saturday was spent laying tiles, it already looks 10 times better!

Sunday was grout day, luckily it only took a couple of hours because my Aunt and Uncle had a five hour drive back home that day.

And then, we cleaned the grout and have a tiled floor!!!

Our floor looks so nice, that now we are in the process of replacing the sink and light fixtures and painting to make the rest of the bathroom look as good :) I'll post pictures as we go
Monday, August 13, 2012
Homemade Peach Jam

Its peach season!!!! My awesome aunt brought over some peaches from Palisade, CO
last week and I decided to try to make some homemade peach jam for the first
time. It wasn’t that hard at all and is really delicious!
The first step was preparation, I washed the canning jars, then covered the lids with boiling water from the kettle, and filled the canning pot with water and put on the stove top to boil.


I then washed and peeled the peaches and separated into small pieces (the directions said to cut the peaches, but they were so ripe I didn't even need to cut them). I placed the peaches a pot to heat and soften, occasionally crushing them. Once the peaches were a soft pulp, I removed them and measured them and then placed back in the pot. I added 1 cup of sugar for every 1 cup of peach pulp and heated on the stove until it thickened.


I then poured the jam into my canning jars, cleaned off the rim with a wet rag, placed the lids on and put in the boiling water. I kept the jars boiling according to the canning directions and for my altitude (35 minutes). At less than 1,000 feet ,if you are using pint size jars it takes 20 minutes, and quart size jars takes 25 minutes, but I suggest looking up the canning time table and checking for your altitude as well.


I removed the jars from the water using a jar lifter and placed the jars on a rag so that they were not touching each other. After letting the jars cool for over 3 hours, I checked the seal, if the middle of the lid does not pop up, your good to go!

I couldn't resist and had to open a jar to try the peach jam right away and it was sweet and delicious! Hopefully I will have some left over to give as gifts!


Thursday, July 19, 2012
Homemade Frozen Entrees
Shaun and I both have a tendency to procrastinate and then when we are hungry at 7pm we have nothing to eat so we end up eating out or getting take out or buying microwave meals. Also, I leave for work at 6am and only give myself about 10-15 mins to get ready and leave for work, so I never eat breakfast at home and love to just grab something to eat in the car on the way to work. Because of our procrastination and sleeping in, I spent most of my day off making foods that I could freeze and then microwave and eat later. Some of these ideas I got off pinterest, some I've been making for a while, and some recipes I just kinda threw what I had in my kitchen together and it turned out pretty yummy!
 I'm obsessed with anything buffalo flavored, so I found a recipe for shredded buffalo chicken sandwiches and just converted it to wraps that I could freeze for a later date! Here is the recipe for the pulled buffalo chicken sandwiches: http://mykitchenapron.blogspot.com/2011/07/crock-pot-buffalo-chicken.html I didn't have the ranch dip mix packet, so I made it without the ranch mix and just put ranch dressing on the wrap before I rolled it up.
 Ingredients:
3 lb bag of frozen chicken
1 bottle Frank's Red Hot Sauce
1 package whole wheat tortillas
Ranch dressing
Place all ingredients in the crock pot and cook on low for 6 or 7 hours until the chicken shreds easily. Removed chicken from crock pot, shred and place on a whole wheat tortilla and place ranch on top. Roll into wrap, wrap in saran wrap, and place in freezer. When ready to enjoy, defrost in fridge the night before and microwave for approx 30 seconds, or just place frozen wrap in microwave for 1-2 minutes. Enjoy!


Ingredients:
10 whole wheat tortillas
12 large eggs
1/4 c. milk
1/2 c. shredded cheddar cheese
1/4 c. bacon bits
hot sauce opt.

Scramble eggs, milk, cheese and bacon bits in a large frying pan. Once cooked, add hot sauce and set aside to cool. Place in tortilla and roll up to make burrito. It makes approximately 8-10 burritos depending on how big you make them. Wrap in saran wrap and freeze! When ready to use, take desired amount out and place in refrigerator the night before. In the morning,
 These were so easy to make, just throw the dry ingredients into a bag and store in your pantry for when you want to bring oatmeal into work. It also works really good for camping! I just used what I found in my kitchen and it is so much cheaper than buying the instant oatmeal packets at the store.
Ingredients per pouch:
When you are ready to eat, just add hot water!

Ingredients:
1 can/bottle of your favorite beer
2-3 cups of green chili
1 tbsp fajita seasoning
4 chicken breasts (I used frozen chicken)
1-2 cups shredded cheddar cheese
Place chicken, beer, 1/2 cup green chili, and fajita seasoning in crock pot. Cook on low for 6-7 hours or until chicken shreds easily (I know the picture shows it cooking on high, I was pressed for time, it took only about 4-5 hours and the chicken was just as tender). Removed chicken from crock pot, shred, and place in separate bowl or back into crock pot after the extra liquid is drained. Add the rest of the green chili, to your taste and stir. Place the chicken and green chili on a tortilla, cover with cheese to your liking. Roll up and wrap in saran wrap. Freeze until you are ready to eat and then just pop it in the microwave. I recommend smothering it in more green chili before you microwave, and for more flavor add sour cream (or nonfat plain greek yogurt ).


I found this muffin recipe on pinterest and absolutely love it! Here is the link: http://travisjessjones.blogspot.com/2012/03/banana-oatmeal-muffins.html
I make these ahead of time, freeze them, and then defrost them in the refrigerator the night before I work. In the morning just grab and go, or you could warm it up in the microwave if you like.
 Ingredients:
 Another super easy recipe. Just use the whole wheat sandwich thins, spread peanut butter and jelly on them and freeze. These are great for lunch on the go or a snack!

Buffalo chicken wraps:


3 lb bag of frozen chicken
1 bottle Frank's Red Hot Sauce
1 package whole wheat tortillas
Ranch dressing
Place all ingredients in the crock pot and cook on low for 6 or 7 hours until the chicken shreds easily. Removed chicken from crock pot, shred and place on a whole wheat tortilla and place ranch on top. Roll into wrap, wrap in saran wrap, and place in freezer. When ready to enjoy, defrost in fridge the night before and microwave for approx 30 seconds, or just place frozen wrap in microwave for 1-2 minutes. Enjoy!

Breakfast Burritos:
These only took me about 30mins to make, and I made two batches. These will be good to freeze and then microwave to eat on my way to work.
Ingredients:
10 whole wheat tortillas
12 large eggs
1/4 c. milk
1/2 c. shredded cheddar cheese
1/4 c. bacon bits
hot sauce opt.

Scramble eggs, milk, cheese and bacon bits in a large frying pan. Once cooked, add hot sauce and set aside to cool. Place in tortilla and roll up to make burrito. It makes approximately 8-10 burritos depending on how big you make them. Wrap in saran wrap and freeze! When ready to use, take desired amount out and place in refrigerator the night before. In the morning,
just microwave for 30-60 secs and enjoy!
 |
| Tip: for all my wraps I like to line them up with the last fold down on the edge of a cookie sheet, this keeps them rolled up :) |
Instant oatmeal:
 These were so easy to make, just throw the dry ingredients into a bag and store in your pantry for when you want to bring oatmeal into work. It also works really good for camping! I just used what I found in my kitchen and it is so much cheaper than buying the instant oatmeal packets at the store.
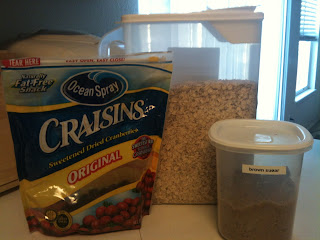
Ingredients per pouch:
1/2 c. quick oats
1 tbsp brown sugar
1 tbsp craisins
When you are ready to eat, just add hot water!
Chicken enchiladas:
This is a combination of a recipe given to me from a friend and just adding whatever sounded good. Perfect for microwaving on days when we have nothing to eat for dinner.
Ingredients:
1 can/bottle of your favorite beer
2-3 cups of green chili
1 tbsp fajita seasoning
4 chicken breasts (I used frozen chicken)
1-2 cups shredded cheddar cheese
Place chicken, beer, 1/2 cup green chili, and fajita seasoning in crock pot. Cook on low for 6-7 hours or until chicken shreds easily (I know the picture shows it cooking on high, I was pressed for time, it took only about 4-5 hours and the chicken was just as tender). Removed chicken from crock pot, shred, and place in separate bowl or back into crock pot after the extra liquid is drained. Add the rest of the green chili, to your taste and stir. Place the chicken and green chili on a tortilla, cover with cheese to your liking. Roll up and wrap in saran wrap. Freeze until you are ready to eat and then just pop it in the microwave. I recommend smothering it in more green chili before you microwave, and for more flavor add sour cream (or nonfat plain greek yogurt ).


Muffins:
I found this muffin recipe on pinterest and absolutely love it! Here is the link: http://travisjessjones.blogspot.com/2012/03/banana-oatmeal-muffins.html
I make these ahead of time, freeze them, and then defrost them in the refrigerator the night before I work. In the morning just grab and go, or you could warm it up in the microwave if you like.
 Ingredients:
2 1/2 cup oats (old fashioned kind, not quick cooking)
1 cup plain low fat greek yogurt
2 eggs
3/4 cup sweetener of choice or 2 tbs stevia
1 1/2 tsp baking powder
1/2 tsp baking soda
2 bananas
Preheat oven to 400 degrees. Spray muffin tin with non-stick cooking spray or line muffin tins with silicone or foil liners (paper liners don't work with a base that doesn't include flour). Blend all of the ingredients in a blender or food processor, and blend until oats are smooth (I have a pretty old blender so I found it easiest to add all of the liquid ingredients and then slowly add the dry ones). Divide batter among cupcake liners and bake for 20-25 minutes or until toothpick comes out clean.
 |
| The front ones are the second batch I made (I forgot baking soda in the first batch [top left], oops! They still taste the same they are just not as fluffy and more of a banana bread consistency) |
Homemade uncrustables:
 Another super easy recipe. Just use the whole wheat sandwich thins, spread peanut butter and jelly on them and freeze. These are great for lunch on the go or a snack!
Thursday, July 5, 2012
milk urn planter

 Luckily, the milk urn was already a light blue when I bought it, so when I scratched off some paint with sandpaper, the light blue looked like metal showing through. Add a trailing plant and a couple mounding plants, (I used creeping myrtle for the trailing plant and then two different color impatiens in the background) and you have a beautiful milk urn planter!
Wednesday, July 4, 2012
i love my newfie . . .

This is my dog, Bear. We got his as a rescue dog and he is 11 months and 115 pounds and growing. He is still a puppy and has a lot of energy, but he is smart and is learning quickly . . . but boy does he have a lot of hair! I just brushed him three days ago, and after brushing him again today, I got this pile of hair! The good thing is if I keep up with brushing him, he doesn't shed as much around the house.

homemade bird bath
This is a really simple craft that I completed in less than an hour, and it really adds to my garden. All you need is a clay pot, clay tray, strong glue (I used gorilla glue), and some paint. I went to the mess-up section at home depot and got a small can of indoor/outdoor paint and primer in one for only $0.50!

Just paint the clay pot and tray, let dry, then glue the bottom of the pot to the bottom of the tray.

 Place in your garden, fill with water, and sit back and watch the birds enjoy their new bird bath!

Just paint the clay pot and tray, let dry, then glue the bottom of the pot to the bottom of the tray.


Subscribe to:
Posts (Atom)